Learn how to make a cone from carrots, chrysanthemum from onions, flowers from radishes and apples. And carving for beginners will help this, which everyone can master.
The content of the article:
Carving in translation from English means "cutting". In cooking, it is the art of artistic cutting of fruits and vegetables. This interesting type of creativity originated in Southeast Asia. Japanese chefs they lined the pottery in which food was served with leaves. They understood that the beautiful arrangement of the leaves gives the dish an additional appeal and began to artistically cut fruits and vegetables.
Later, carving penetrated Europe, but at first it did not have much popularity here. However, with the advent of restaurants, this art has become in high demand.

There are kits for artistic cutting for every budget and taste. But carving for beginners can be carried out without the use of special equipment for this type of creativity.
If desired, you can turn sets for wood cutting, for linocut into tools for carving.
The most important knife used in this type of creativity is Thai. That's what he is.
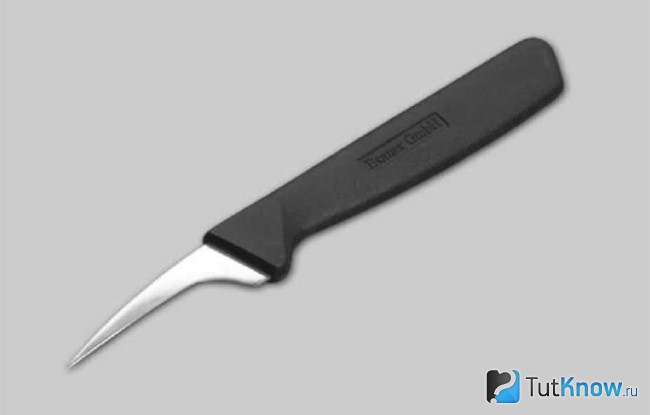
With the help of such a tool, you can perform various carving elements from vegetables and fruits. Therefore, if you have a similar narrow knife with a thin blade, you can use only one at the initial stage. As you master this technique, you can purchase additional equipment to create more and more complex and interesting compositions. For these, the following types of knives are used:
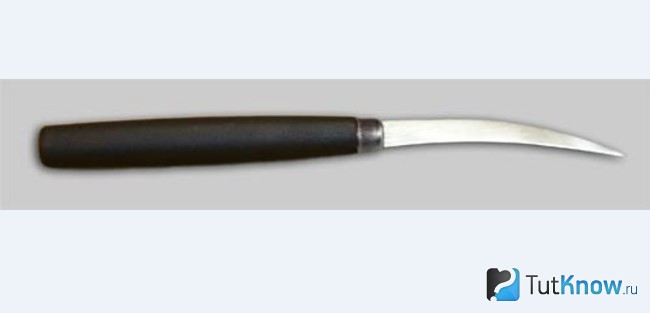
- Thai - sickle-shaped curved and wedge-shaped knives also belong to the group of these tools.
- Karbovochnye are V-shaped tools, as well as oval and round.
- Flute. Used to remove thin strips from fruits and vegetables. Flutes are the decorative grooves on such instruments.
- Noisettes are notch knives that are used to cut shapes out of fruit. They have a different shape (rhombus, round, clouds, etc.).
- Engraving and other carving knives with replaceable blades are used if you need to peel, remove the core; clean vegetables, etc.
- Culinary tools such as our domestic cookie molds.

Here is a sickle-shaped knife, which is used, like the Thai one, but they cut larger parts with it.
The fluting knife makes it easy to groove fruits and vegetables. First, longitudinal strips are made with this tool, and then, for example, a lemon is cut across in circles and flower-shaped figures are obtained.

Carving knives for carving come in various diameters. They can be V-shaped and U-shaped. The first is easy to cut out the leaves, to carry out engraving images on the fruit bark.

With the help of U-shaped knives, ornaments with rounded cuts are created.

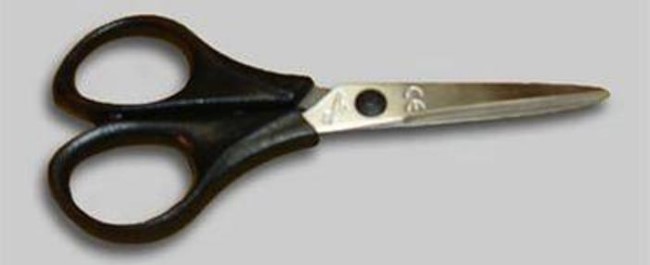
Also included in the carving tools are small scissors. With the help of them, flat straight, oblique or other cuts are made along the edge of the fruit.
Another interesting tool for carving is a double-sided noisette spoon. It is used for extracting pulp from large fruits, cutting balls, hemispheres.
The noisette spoon is often used in french cuisine. Cooks use this tool to cut balls from raw potatoes and then deep fried.

If you have not acquired such tools yet, you can replace them by carving vegetables and fruits with a scalpel, a fruit peeler.

Decoration from vegetables - a flower from a radish
The dish looks much more attractive if such an edible flower flaunts in its center or side. Even those who have never done this before will be able to cut it out of a radish. For this decoration, you can use ordinary small scissors and a sharp knife. In addition to them, you will need radishes. The root crop should be even, rounded. In the photo it is red, but now those who grow this vegetable in their backyards know that radish varieties of various colors have been bred. Therefore, a lily from this vegetable can be red, pink, yellow and even purple.

Cut off the top of the radish and mentally draw a 5-gon here. Now lead from this place down with a knife (but not all the way) so that the first petal is indicated. So complete all five.
To make the next, inner row of petals clearly visible, cut around the layer of pulp that is located between the first and second row of petals.
Now take the scissors and process all 5 petals of the outer row with them, sharpening the top of each, as shown in the photo.

Next, complete the second row of petals, which is staggered relative to the first. Then - the third and subsequent inner rows.
This is how you can make salad dressings from vegetables. Try to cut not only a lily, but also a rose from a radish.

To make it so multi-petalled, wash the root crop, cut off the green part from it. On the opposite side, make several parallel cuts in the center and then on the side of the root. Take another radish, chop it into thin circles. Insert them into the slots of the first root crop. Here is such an elegant flower you got. Find out what other salad dressings you can cut out quickly.
How to make a lily from an onion?

Here is such a wonderful chrysanthemum you will get in just 5 minutes of work.
For this carving you will need:
- large onion;
- sharp knife;
- a bowl of water;
- beetroot juice.

Now make a cut perpendicular to this, and then a few more. The more of them, the more fluffy the flower will turn out.

Pour water into a bowl room temperature, lower the workpiece into it, let the onion lie in the liquid for 40–120 minutes. During this time, the petals will "bloom", and you will get a beautiful carving flower.
The time for soaking onions in water depends on the variety. Some will begin to "bloom" as early as 40 minutes, while for others, the waiting time for this process will be longer.
Now moisten the workpiece in beetroot juice, and you will get such a wonderful flower.

You can, by turning the chrysanthemum over, moisten only the tips of its petals in the juice, or place the entire flower in the food coloring liquid.
How to cut a delicious carrot decoration?

Don't these bumps look bright, realistic and festive? You can make them using carving knives, or by taking a regular kitchen knife with a narrow blade.
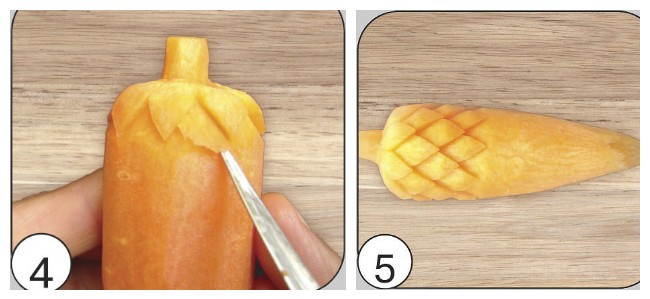
Take a root crop with a diameter of at least 3 centimeters. Cut upwards so that the length of the carrot is 8–12 cm. Remove the extreme pulp at the wide end of the root crop so that a square “tail” remains.

Now process the workpiece from the same side along the turn, rounding its hangers from all sides. Then visually divide this top of the carrot into 6 parts, which will turn into scales of a do-it-yourself cone.

Deepening the tip of the knife by 2–3 mm, mark these scales. To prepare the area for the second row of scales, cut the carrot pulp in a circle just below the first. In the same way, but in a checkerboard pattern, complete the second row of scales. Beneath it again remove some carrot pulp in a cone to make the third row of scales, which will be staggered in relation to the second.
In the same technique, you can make a few more cones to create a beautiful vegetable bouquet.
To harden the carrots and open the scales, place them in ice water for 15 minutes.

If you made this salad dressing, then place the cones in the center of the dish or place them along the edge of it. If you want to create such an amazing bouquet, as in the photo, then string the processed carrots on a wire wrapped in green floral tape. You will stick the second end of the wire into a pumpkin, the flesh of which is also carved using the carving technique. It remains to cut the petals from the cucumber, decorate the composition with dill, after which you can put it in the most prominent place in the house or in the center of the festive table.

If you have carving knives, then use a V-shaped knife to make pointed scales. A U-shape will help create rounded ones.
Today you learned how carving is made from vegetables. Follow the publications and soon you will learn how to artistically cut fruits that will turn into a firebird, a basket, and become colorful flowers.
In the meantime, check out the videos from which you will learn how to cut a rose from carrots, see what ordinary vegetables can be turned into with carving:
It is better not to eat at all than to eat without appetite. Edibles will help make lunch boring DIY vegetable flowers. How to turn any dish into cooking masterpiece, will tell and show about this in this article.
All easy to do yourself, for this you don’t really need anything other than a sharp knife and a little effort. Who read the last article on the site, he could not help but notice how beautifully, in a festive way, the dish is decorated with the help of flowering roses carved from vegetables. As I promised last time, today is a master class on the production of these wonderful, extraordinarily beautiful masterpieces of art - an edible flowering garden on the table. To decorate the festive table, we need: radishes, boiled beets, tomatoes and boiled carrots.
And we will cook from all the listed vegetables: radish buds, roses from beets and tomatoes, as well as carrot bells. So let's get started!
radish buds
1. We make arcuate cuts in a circle along the fruit with a knife. You will get 4 or 5 "petals", depending on the size of the radish fruit.

2. Around the petals, remove the pulp with a thin layer. Give the core of the radish fruit a rounded shape  and in the end we decorate the resulting beautiful bud with parsley sprigs.

Beetroot roses
1. Peel the boiled chilled beets. Using a sharp knife, cut the base in a spiral.

2. Put the base on a dish. Let's cut out the "petals": for this we will cut off thin beet plates, moving with a knife in a spiral.

3. We put the petals in the bud: carefully folding, put in the center of the base. Thus, we collect the whole flower from the “petals” - beet plates. Decorate the beetroot rose with parsley sprigs.

roses from tomatoes
1. We need a strong ripe tomato of medium size. We will remove the stem from it.

2. Now, with a sharp knife, we begin to cut the skin in a spiral. In this case, the knife must be moved in small movements back and forth so that the rose petals are wavy.

3. Gently fold the resulting spiral ribbon into a rosette, which we decorate with a sprig of parsley.

carrot bells
1. Peel the boiled chilled carrots and make small grooves in it. We sharpen the base with a knife so that it looks like a cone.

2. Holding the knife at an angle to the fruit, cut the flesh at the base of the carrot so as not to break the shape. By cutting off the first "cone", we get a "bell" with a jagged edge. Now you can start cutting the next one.

3. Fold the resulting three bells to each other and decorate with greens.

As you can see, do vegetable table decorations it’s not so difficult with your own hands, it takes only three steps to turn an ordinary vegetable into a flower of extraordinary beauty! The main thing is to do all the work carefully, show a little effort, a little patience, and then beautiful roses, bright buds and elegant bells will bloom on your table, which will completely transform any dish and raise everyone's appetite and mood!
Watch the video for another easy way to carve roses from beets and carrots. Happy viewing.
Now many housewives not only strive to cook delicious and interesting dish, but also serve it in its original form, decorating with elegant curls, fancy cuts.
Summer is the perfect time to experiment with vegetable decorations.
Table decorations from vegetables are easy to make yourself, for this you don’t really need anything other than a vegetable peeler (or a sharp knife) and a little diligence.
Floral elements are the most popular and simple decoration. They can be made from numerous vegetables. So, ordinary roses are made from radishes, cucumbers, carrots, radishes, or daikon, which is very convenient for culinary crafts.
And today a master class from Yeva64 for the production of these wonderful, extraordinarily beautiful masterpieces of art - an edible flowering garden on the table.
As a starting material we will use:
- salted or pickled cucumber,
- fresh cucumber
- fresh carrots
- white long radish.
In addition to vegetables, we also need a vegetable peeler to cut toooooo little stripes. Without her, no way!
I take vegetables small, not large and not very long! Since I use each stripe for only ONE petal! It's much easier...
For reference: About 10-12 stripes go to one rosette (which is about half of a small cucumber or carrot).
Pickled or Pickled Cucumber Rosette 
Cucumbers can be simply cut into circles and put in a plate on festive table. Yes, but it will not create a special mood and emotions. Another thing is to cut an exquisite flower from a cucumber.
 |
We begin to plan our cucumber into stripes. Moreover, we do not need the very first strip (peel). |
 |
We reach approximately the middle of the cucumber (it’s not worth it until the very middle, (it’s not worth it until the very middle, the central stripes usually fall apart in half, you yourself will feel ...), |
 |
Then we turn it over and start planing from the opposite side. |
 |
Here I have how many stripes I got from one little cucumber. (We won’t need the remaining bar, in the photo it is next to the vegetable peeler ...) As you can see, especially trying to get perfectly even and beautiful stripes is completely superfluous !!! Moreover, do not try to get beautiful tips! They will not be visible, as they will be located at the bottom of the rose. What you cut, you cut! Of course, we reject very narrow strips, the rest will do! Even with one beautiful edge or with shaggy tips ... |
 |
Doing center of the rose We take one strip (preferably from narrow or short ones) and twist it into a tube, a little spiral. |
 |
It doesn't have to be very tight! |
 |
Now we do first petal: We take another strip |
 |
we lay one of its edges behind our tube, a little lower, bend it FROM YOURSELF, lower the second end down to the base of the rose, and wrap it around, as it will, but lower ... |
 |
It turns out such a loop. The first petal is ready! |
 |
We apply the next strip to the base of the first petal, also bend it FROM YOURSELF, and wrap the end around ... |
 |
Here is the second petal! |
 |
A few tips: - Since the strips are very thin and wet, they stick together perfectly! There is no need to make any efforts to keep our structure in the “assembled” state! Here are already collected 6 petals ... |
 |
Don't try to get some perfect shape and symmetry! The more “loose” and “anarchic” you collect your rose, the more natural it will eventually look! Making the 7th petal... |
 |
The only thing is, try to apply each strip to the rose so (in that place) that the petals are offset. Sometimes with a little, sometimes with a big one, even opposite the previous one... There are already 9 petals ... |
 |
If your stripes are too long, then you can cut off the excess from the end along the way so that the bottom of the rose does not turn out to be too voluminous! There are already all 11 petals ... |
 |
And yet, apply the stripes slightly with an inclination (upward) so that the petals lay down beautifully ... Rose is ready!!! Look, it holds up perfectly without any toothpicks! |
 |
Now we make a couple of leaves. We cut off the tip obliquely from another small cucumber, at a large angle! |
 |
Let's cut this one in half... |
 |
And two leaves for the rose are ready! |
 |
What a beauty! |
You can decorate the salad...
Fresh cucumber rose
To make a rose from fresh cucumber, you need to cut it into long strips, leaving the skin and not taking the central, core part, since it is the most brittle.
We twist the first strip with a tube or spiral, and place the rest one by one around them: so that each “petal” is located slightly lower than the previous one.
To do this, we apply the strip to the base of the piece going in front of it, make a fold away from us and wrap it around the already formed part.
The cucumber is sticky, so there is no particular need to attach the petals very tightly - on the contrary, the looser you can attach the slices, the more natural the rose will look. To make the product look elegant, the strips should be applied slightly obliquely, imitating the placement of petals in ordinary flowers. You can make rose leaves from fresh parsley or pieces of cucumber peel. 
In general, everything is the same! So without too many details, just a photoshoot...
By the way, my cucumber was far from the first freshness, the strips turned out to be rather shaggy ... However, the end result is no worse!
We plan our cucumber on both sides into stripes, we do not need a central block.
 |
 |
We twist the middle of the rose and the first petal ...
 |
 |
 |
 |
Second petal... 
 |
 |
 |
 |
 |
 |
 |
 |
Video Tips
Fresh carrot rose
Working with a carrot is more difficult than with a cucumber: it is harsh, there may be more shaggy petals than on a cucumber. If there are a lot of them, you will need to cut them with scissors. It is better to fix the finished carrot rose with a toothpick. And to give original shades, it is tinted with beetroot juice and then lubricated vegetable oil: so the carrot rose will not quickly weather.

It is a little more difficult to make a rose from a carrot, because it is a little more harsh and not so obedient ...
Therefore, a rosette of carrots should still be fixed with a toothpick at the end of the process ..
And there are many “shaggy” bottoms, since it is difficult to wrap the ends of the strips around the base. So what? They can be easily cut with scissors...
 |
And yet, a carrot, especially if it is plump, can be cut not from two opposite sides, but from all four! Like this... |
 |
Collecting... |
 |
... carefully attaching the petals... |
 |
...in sequence. |
 |
Fixing... |
 |
Trimming... |
 |
Ready! |
 |
 |
 |
- Carrot rosette can be slightly TINTED with beetroot juice (just anoint with a piece of beetroot). What a gorgeous “color” turned out ... |
 |
Carrot rosettes are very desirable to LUBRICATE with vegetable oil (lightly, gently and carefully, with a soft brush), because they are very quickly weathered! But cucumber roses are more moist, so they hold up perfectly! |
 |
- If you do not decorate the salad right away, then the roses (any!) should be STORE in the withers in a tightly closed container or under a film ... But no more than 2-3 hours! |
 |
But if you need to make roses in 1-2 days, then they can be smeared with a thin layer of gelatin solution! This will give the roses shine, glue them together, and also allow you to keep them in their original form! I almost never do this, because screwing a couple of roses is a matter of 3-5 minutes! |
Video tip
Rosette from radish

The radish rosette turns out to be very beautiful, white!
And besides, it can be easily tinted - in any color! Better in yellow, pink or red..
 |
The radish needs to be taken a little oblong so that its length is enough for the petals! |
 |
Cleaning... |
 |
And, as usual, we begin to cut thin and not very wide strips. And so that the strips are not too wide, we cut the radish around the entire circumference, and do not skid in one place ... |
 |
We wrap one strip into a tube - this is the center. |
 |
Well, on to the instructions.... |
 |
Gorgeous roses are obtained! Very beautiful, white, soft... |
 |
Radish roses, like carrot roses, need to be fixed with a pair of toothpicks, and also lightly greased with vegetable oil (so as not to weather) ... |
I rolled three roses ... And here's why:
Radish roses can be easily tinted - in any color! I do not like food colorings, I prefer carrot or beetroot juice! Therefore, I get roses - yellow, pink or red ...
Depending on the intensity of staining, you can get different shades of yellow and red .. From pale cream to apricot, from pale pink to dark brown ...
Today I will show the coloring process beetroot juice.
I used juice from a freshly opened jar of beets (borscht blanks), but you can squeeze a piece of fresh beets in a juicer, or grate some beets on a fine grater and squeeze through gauze ...
If you need a not very saturated color, the juice can be slightly diluted with water ...
 |
Color one rose red. You can leave it in the juice for a couple of minutes, you can for half an hour, you can and much longer! Depending on what color you want... She “took a bath” with me for about half an hour (while I was making the rest of the roses) and it turned out to be a rich red color ... |
 |
Then we take the rosette out of the juice and carefully transfer it to a napkin for a couple of minutes so that all excess moisture is removed from the glass. |
 |
Turn over... and enjoy! Also lubricate with a little vegetable oil ... And the rose is ready! |
 |
We will paint the second rosette in PINK, but not all, but in the melange style - with strokes ... You can do this with a silicone brush or a napkin dipped in juice (like me). With light, gentle, stroking movements, we touch the outer protruding parts of the petals.. |
 |
We are touched ... Lubricate with vegetable oil... We leave the third rose in its original form - WHITE ... |
Now we are building a festive composition ... 
And ... immediately faint from this beauty .........
Yes, and more...
I can say that the roses are perfectly preserved even after 7 hours!!! (although they just stood on the table in the kitchen) - they practically didn’t get weathered, the colors didn’t fade .. well, they just faded a little bit ...
Why am I .. And to the fact that roses will adequately withstand any many hours of feast !!!
And in order for the roses to retain their appearance for one or two days, they are lightly smeared with a gelatin solution. It will be appropriate for a wedding or a big celebration.
As you can see, making table decorations from vegetables with your own hands is not so difficult, just a few steps separate the transformation of an ordinary vegetable into an unusually beautiful flower!

The main thing is to do all the work carefully, show a little effort, a little patience, and then beautiful roses will bloom on your table, which will completely transform any dish and raise everyone's appetite and mood!
How to make a cooked dish even more attractive? How to create an atmosphere of joy and beauty?
There are simple and accessible decoration techniques festive dishes. You will need the most common products, a minimum of costs and a minimum of time. Flowers from vegetables are a win-win option.
Difficulty level - for beginners. Start right now to make the world around you brighter and more interesting!
- Follow the basic rules for combining a color palette and products. Feel free to use contrast.
- It is preferable to decorate salads (and dishes in general) with those products that are part of the salad itself or are combined with its components.
- If the decoration is intended for cutting, then it is better to take a plain plate, without a pattern, so that it does not interrupt the composition.
Master class "Flowers from vegetables with their own hands"
Attention! Flowers can be made in advance and immersed in water, and then, immediately before serving the dish on the table, decorate a salad or sliced with them.
Take tin can(for example, from under beer), cut out a rectangle with scissors and bend it in half (see photo). Such a simple device will help you in creating a cabbage flower.
Move from the outer layer to the center.
Dip the finished flower for better preservation in water.
Lush aster is ready!
Divide the peeled carrot into 2 parts. The smaller part is the base of the future flower, curly petals are made from the long part. It is convenient to use a special cannelling knife - it applies decorative grooves to vegetables, fruits, mushrooms, cuts cucumbers, radishes, carrots with thin chips.
Petals are inserted into the notches of the base in a circle. This can be done in any order.
A bright fantasy flower made of carrots will decorate any dish!
Use a sharp knife.
Simple, cheap and pretty!
I really hope that my advice will be useful and will be in demand!
To decorate the festive table and give any dish an unusual look, it is enough to simple products and basic skills. From our article you will learn how to make a charming flower from carrots and leaves for it, and a detailed master class with photos and videos will help you not to make a mistake.
Carving will help us turn a familiar vegetable into an unusual decor, which will turn any salad or aspic into an original, author's dish.
Products and tools
So, what do we need to create roses and carved openwork carrot leaves?
Carrot
We choose a root crop of large size and fairly wide in diameter. This is especially true for the manufacture of leaves - it will be much easier to work with this, especially for the first time.
Carrots should be fresh and juicy, with bright orange flesh on the cut, as any cavities or loose texture will greatly aggravate appearance flower.
Knife
In order to make a carrot flower, you will need a knife with a very sharp blade to create neat cuts or a special slicing machine.
When it comes to leaves, we will arm ourselves with a special carving knife with a short beveled blade. Due to its miniature size, it will allow you to make precise small cuts.
toothpicks
Useful for fixing rose petals.
saline solution
It should not be too concentrated, we make it at the rate of 1 tsp per glass of warm water. In the solution, we will soak the carrot slices so that they become more elastic, twist easily and do not break.
Now that we have armed ourselves with everything we need, we can start carving.
Carrot flower
Step 1
We wash and clean fresh carrots, and then cut them into thin circles no thicker than 1-1.5 mm.
They should get at least 18-20 pieces - this will make our rose lush and very similar to the real one.

Step 2
Put on a baking sheet or in a deep dish and fill with saline.

Keep them like this for 30 minutes, then drain, transfer to a dry dish and additionally blot with a towel or paper towel.

We lay out the circles of carrots on a table or other flat surface in a row, as in the photo. We make sure that the gap between them is no more than 1 cm and choose the circles in size so that they go from smaller to larger.

Now the most difficult part begins - we need to twist the strip into a roll.

Moving from large to small, we twist the slices as tightly as possible, and then, holding the roll with one hand, we fix it with several toothpicks.
We pierce all the petals, first horizontally, then vertically.

We straighten the petals so that the flower becomes indistinguishable from a real live rose.

In case you still have questions, we recommend watching a video that clearly demonstrates how to make a flower from carrots.
Flower (rose) from carrots (video)
Well, how to cut openwork leaves of bright orange color?
Carrot leaves
Step 1
We wash and clean large carrots - the wider it is, the better. We cut it in half lengthwise, and then cut off from one of the halves also along a wide, but thin (2-3 mm) slice, as in the photo.

Step 2
With a carving knife, cut off the excess along the edges, if any, forming a sheet from the cut.

Then, at an equal distance - 1-1.5 cm, we make short cuts along the edges. They must look straight up.

Putting the blade at a different angle so that it turns out to cut out small sectors, we cut through them and take them out. Now our leaf looks almost like a real one.
Step 3
Stepping back a little from the edge, cut out small rhombuses from the inside with a knife. Decorative cuts should be located exactly under the protruding parts of the sheet - this will make the composition more harmonious.

We process several carrot slices in this way, as shown in the photo.
How to cut an openwork leaf from carrots (video)
We decorate with the resulting decorative elements - roses and leaves, any salads, dishes with cold appetizers and cuts, aspics and even roasts.
Now you know how to make a flower from a carrot and leaves from it. Be surprised by the dexterity of your hands yourself and surprise your guests, friends!


